Centro assistenza
Hai domande sulle nostre chitarre, desideri saperne di più o hai bisogno di una riparazione? Allora sei nel posto giusto!

Domande frequenti
Molte domande, molte risposte. La tua domanda potrebbe già avere una risposta. Cerca nella nostra FAQ qui sotto o sentiti libero di sfogliare le domande.
Informazioni generali 13
Posso acquistare una chitarra direttamente da Lakewood?
Se non hai un rivenditore nella tua zona e ti manca un referente locale, puoi acquistare la tua futura chitarra Lakewood direttamente da noi al prezzo di vendita consigliato (RRP).
Se ti sei già informato sulle nostre chitarre presso un rivenditore Lakewood, sei comunque il benvenuto a venirci a trovare, scegliere il tuo strumento personale nel nostro ampio showroom oppure ordinare una chitarra Customshop. In questo caso, il pagamento avverrà tramite il tuo rivenditore Lakewood.
Quali negozi di musica vendono chitarre Lakewood?
Posso consegnare il mio legno a Lakewood per costruire una chitarra?
Come è nato il nome commerciale “Lakewood”?
Dove vengono prodotte le chitarre Lakewood?
Dove posso registrare la mia chitarra?
Dove posso trovare il modello e il numero di serie?
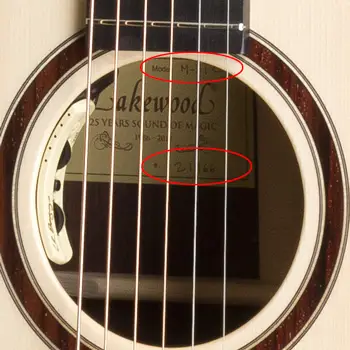 La descrizione del modello e il numero di serie si trovano sull'etichetta situata all'interno della chitarra, visibile attraverso la buca del suono.
Che cosa significano le lettere e i numeri dei nomi dei modelli?
Quando (in che anno) è stata costruita la mia chitarra?
I numeri di serie possono essere assegnati all'anno di produzione. Ecco una ripartizione:
Numero di serie (da - a) / anno di produzione
195-461 / 1986
462-1150 / 1987
1151-1912 / 1988
1913-2707 / 1989
2708-3683 / 1990
3684-4847 / 1991
4848-5666 / 1992
5667-6464 / 1993
6465-8277 / 1994
8278-8722 / 1995
8723-9590 / 1996
9591-10129 / 1997
10130-10631 / 1998
10632-11151 / 1999
11152-11899 / 2000
11900-12702 / 2001
12703-13648 / 2002
13649-14629 / 2003
14630-15489 / 2004
15490-16327 / 2005
16328-17142 / 2006
17143-17938 / 2007
17939-18776 / 2008
18777-19626 / 2009
19627-20449 / 2010
20450-21383 / 2011
21384-22260 / 2012
22261-23316 / 2013
23317-24404 / 2014
24405-25414 / 2015
25415-26533 / 2016
26534-27705 / 2017
27706-28764 / 2018
28765-29975 / 2019
29976-31180 / 2020
31181 - 32397 / 2021
32398 - 33466 / 2022
33467 - 34776 / 2023
34777 - 36054 / 2024
36055 -
Qual è la durata della garanzia Lakewood?
Le condizioni complete della nostra garanzia sono disponibili qui..
La mia chitarra ha bisogno di una riparazione. Come devo procedere?
Ci sono tour della fabbrica a Lakewood?
Una nuova chitarra rende felici?
Problemi e assistenza 15
Riparate anche chitarre di altre marche?
Sì!
È proprio quello che fa il nostro Centro di Competenza per Chitarre.
Trovi tutte le informazioni su https://de.guitarhelp.eu/
Malfunzionamento del sistema di pickup
Informazioni generali
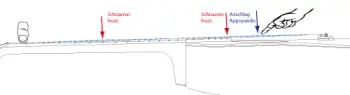
Il sistema L.R. Baggs Anthem è composto da un’unità di controllo fissata alla tavola armonica, nella zona della buca, mediante tre pad adesivi elastici.
I comandi includono volume, miscelazione del microfono, interruttore di fase e un pulsante per il controllo della batteria con indicatore di stato a cinque livelli.
Un pickup è posizionato sotto l’osso del ponte. Un microfono è fissato all’interno della tavola, vicino al ponte, con due pad adesivi.
Entrambi i trasduttori sono collegati all’elettronica tramite cavi coassiali e connettori jack da 2,5 mm.
La presa d’uscita del sistema è situata sul bordo dell’eclisse, presso il blocco terminale della chitarra.
Il cavo tra elettronica e presa è montato sull’elettronica tramite un connettore piatto bloccabile e fissato all’eclisse con fermacavi. I cavi dei trasduttori sono fissati alla tavola e all’eclisse.
La batteria da 9 volt necessaria per l’elettronica è alloggiata in una tasca con chiusura in velcro fissata sul fondo della chitarra e collegata all’unità di controllo tramite un cavo.
Dati tecnici
Impedenza d’uscita: 620 Ohm
Consumo di corrente: 3,5 mA
Durata della batteria: circa 170 ore (a seconda del tipo di batteria)
Peso (inclusa batteria 9 V): 162 g
Risposta in frequenza: ~60 – 250 Hz (pickup del ponte), ~250 Hz – 20 kHz (microfono)
Problemi conosciuti
Presa d’uscita
Contatto instabile che interrompe brevemente il segnale quando il jack si muove.
Questo problema può essere causato dall’uso di connettori di bassa qualità con diametro inferiore a 6,35 mm.
Soluzione: Sostituzione della presa con il relativo cavo di collegamento.
Pickup del ponte
Volume delle corde non uniforme.
Soluzione: È possibile che durante il cambio corde l’osso del ponte si sia spostato o che un granello di polvere sia finito nella scanalatura. Allenta le corde, rimuovi l’osso e soffia bene nella scanalatura.
Microfono
Finora non sono noti problemi.
Unità di controllo
Rumori di vibrazione possono verificarsi su tutti i componenti mobili dell’elettronica o dell’alloggiamento.
Vibrazioni causate dai comandi di volume e di miscelazione.
Soluzione: Sostituzione completa dell’unità di controllo.
Guasto dell’interruttore di fase.
Soluzione: Sostituzione completa dell’unità di controllo.
Nessun segnale udibile.
Soluzione: L’elettronica è guasta e deve essere sostituita.
Domande
Posso riparare da solo i guasti del sistema L.R. Baggs?
Risposta: Nella maggior parte dei casi non è possibile. Ti invitiamo a contattare : repairs@lakewood.de
The string action is uncomfortable
The curvature of the soundboard appears to be excessive
The curvature is naturally impacted by pull from the strings; flattens out slightly between the bridge and sound hole and becomes a little stronger behind the bridge. These changes are normal and do not affect the instrument. Should you detect patent or irregular changes in the soundboard curvature of your guitar, please contact us by email on service@lakewood.de.
The frets are uneven and worn
General
Frets are positioned in semitone intervals at calculated positions on the fret board. These positions determine the correct intonation of the instrument. The positions must obviously be correct from the start and they will remain unalterable thereafter. As a result, fret inaccuracy would hardly ever be applicable; instead it is more likely for an instrument to be inaccurate in regard to the octave position.
Frets are made of a copper, nickel and zinc alloy, sometimes referred to as ‘new silver’ which arose from the silvery gloss of the material, which does however not contain any silver.
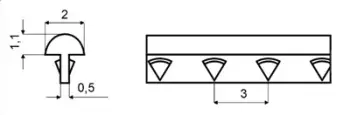
The fret wire used by Lakewood is of medium hardness and gauge as shown in the diagrams below. Also visible are the diamond-shaped barbs which help to retain the frets in their slots on the fret board. Frets are not glued so that they can be removed without damaging the fret board.
Assessing the fret surfaces
Frets have a curved surface to provide the strings with a well-defined contact point. This point will wear over time which will eventually lead to fret buzz or intonation problems. The more an instrument is played or the heavier the string gauge or the harder strings are fretted, the deeper the fret grooves will become. This will be acceptable for some time, until the grooves become such that a fret-dressing or replacement becomes necessary.
Dressing and replacement of frets
Both the dressing and replacement of frets must be handled by qualified technicians. You may gladly contact service@lakewood.de per email and please enclose a photograph on which the fret grooves are visible. We will then let you have an estimate of the repair costs.
Problems and Questions
- Individual frets are loose.
Answer: Please contact service@lakewood.de - Does fret-work fall under the Warranty?
Answer: This work is not covered by the warranty. - Would it be better to use very hard fret wire?
Answer: Not necessarily, harder fret wire leads to more string wear - Is it sensible to use higher or wider fret wire?
Answer: No, higher frets require a significantly more disciplined playing technique because strings hardly have any contact with the fret board. Broader frets can impede precise intonation.
One or more strings are rattling / buzzing
General
Please rest assured that a ‘rattle-free’ guitar has not yet been built and that we may expect the rules of physics to apply into the future.
Rattle occurs when vibrating strings make contact with the frets. The vibrations interfere with the string oscillation and lead to an impure sound. The energy in the string is partially absorbed by the rattle which leads to a quicker decay of the tone.
Causes of rattle (fret-buzz)
Rattling of strings may be due to a number of causes. Imprecise playing technique in either left or right hand often leads to string rattle. The fretting of a string (finger placement vis-à-vis the fret) may cause unwelcome vibrations.
On over-powerful strum with the right hand or the equivalent of a flamenco-like Apoyando can drive the vibrating string too close to the fret board.
These aspects of technique should be critically evaluated as they can either themselves or in conjunction with characteristics of the guitar be lead to string rattle.
Naturally, there are other causes of string rattle:
- Worn or faulty strings are the most common cause
- A string action unsuited to the guitarist’s playing style (see the section How can I measure and adjust the action of my guitar?)
- Uneven fret height (see the section on The frets are uneven and worn)
- Incorrect adjustment of the truss rod (see the section on How do I adjust the truss rod?)
- Excessive notch depth of the nut (see the section on How the nut can be checked)
Subjective perception
What may seem unacceptable string rattle to one player might not bother another and even be appealing to a third player who chooses this as his preferred musical ‘sound’. While we don’t intend to persuade any player to accept a rattling guitar it might be good to put one’s own perception into perspective. Strictly speaking, no guitar is rattle-free; indeed you can express and emphasise these sounds. To focus on these tones unduly might lead to an eventual loss of pleasure in the music.
Technical flaws must clearly be eliminated but, realistically, only in sync with improvement of the player’s technique.
Unwanted noise while playing
There may be unwanted vibrations which disturb the pure sound of the guitar. The definition, identification and treatment of these can be laborious but, if systematically addressed, can be successfully removed.
Vibrations while playing
Vibrations are always mechanical in nature. A guitar consists of numerous components, not all of which are secured by means of glue. These may loosen and cause unwanted vibrations at certain frequencies during playing. To pin-point such an item, you should proceed methodically, step by step, starting at the head stock.
Tuners (machine heads)
Check the functioning and positioning of the tuners. For more information, go to Care and maintenance of the machine heads (tuners).
Strings
Check if there is a string buzz/rattle. Refer to the sections on One or more strings are buzzing and How can I measure and adjust the action of my guitar in the FAQ section.
Correct stringing of the guitar
For the correct securing of strings at the tuners and the bridge, please see How do I restring my guitar in the FAQ Section.
Nut
Check the secure placement of the nut and the level of the nut grooves; see How the nut can be checked in the FAQ Section.
Frets
Check the fret ends for firmness and the fret surfaces for playing marks. See The frets are uneven and worn or Checking the fret ends in the FAQ Section.
Truss rod
Check the proper setting of the truss rod. See How do I adjust the truss rod in the FAQ Section.
Saddle
Check the surface of the saddle (bridge insert). Grooves in the material can give rise to unwanted vibrations and to address these, see How the saddle can be checked in the FAQ Section.
Braces
Check that the braces under the soundboard and in the body of the guitar are secure.
Pickup and Electronics
Built-in pickup systems can give rise to vibrations. Both cables and moving parts of the pick-up system may vibrate at particular frequencies. Read more on this in the FAQ section under Pickup system malfunction.
Il bottone in legno della meccanica slitta
I bottoni in legno sono dotati di un cuscinetto metallico. Il collegamento tra il bottone e il suo cuscinetto può allentarsi, causando difficoltà nell’accordatura. Inoltre, un fissaggio insufficiente tra bottone e cuscinetto può provocare vibrazioni.
In questo caso è necessario rimuovere il bottone dall’alberino della meccanica. Allenta la corda di almeno un tono e svita la vite di fissaggio sulla testa del bottone con un cacciavite adatto.
Fai attenzione, quando rimuovi il bottone, che le due rondelle (una metallica e una in plastica) restino sull’alberino — sono essenziali per il corretto funzionamento della meccanica.
Rimuovi quindi il bottone e estrai il cuscinetto metallico, che può essere reincollato con una piccola quantità di Superglue. Attendi qualche minuto prima di rimontare la meccanica.
Se non riesci a eseguire questa riparazione da solo, puoi richiedere un ricambio scrivendo a: service@lakewood.de
Le singole corde si rompono spesso
A volte la rottura di alcune corde può essere causata da un difetto del materiale stesso. Tuttavia, nella maggior parte dei casi, le cause sono diverse. Controlla la tua tecnica di esecuzione ed esercita un po’ di autocritica: un attacco troppo forte, soprattutto vicino al ponte, può sollecitare il materiale della corda oltre il suo limite di resistenza.
Altre possibili cause possono essere piccole bave o spigoli sulla sella del ponte, formatisi con il tempo. Controlla il punto in cui la corda entra in contatto con l’osso. Se senti una scanalatura pronunciata o uno spigolo tagliente, rimuovi la sella e leviga leggermente la parte superiore arrotondata con carta vetrata fine (grana 320 o superiore), in modo che la corda possa scorrere liberamente sopra la sella.
Poiché le incisioni sono di solito minime, dopo questa operazione non si noteranno variazioni significative nell’altezza delle corde.
A bridge pin is dislodged during a string change
Take care to kink the string slightly at the ball end before feeding it into the bridge slot and then push the bridge pin firmly home. Should the bridge pin lift during tuning, you may press it home with your thumb.
My guitar’s finish is scratched or dented
My high gloss finish has a milky sheen
The screw of the strap button has loosened
Cracks in the Body or Neck of the Guitar
The fret edges protrude or feel sharp
Lakewood Customshop 5
Come posso ordinare una chitarra Customshop?
Con il nostro configuratore 3D puoi creare la tua chitarra dei sogni, esattamente come la desideri.
La cosa migliore è iniziare visitando un rivenditore Lakewood vicino a te – oppure venire direttamente da noi – per provare alcune chitarre e capire quali larghezza del manico, scala, dimensione del corpo e combinazione di legni potrebbero fare al caso tuo.
Se durante la progettazione hai delle domande, contattaci pure direttamente oppure rivolgiti al tuo rivenditore di fiducia.
Dopo di che, hai due possibilità:
Contatti il tuo rivenditore, gli invii il PDF via email oppure invii la richiesta d’ordine direttamente tramite il configuratore.
Contatti direttamente noi, chiarisci con noi eventuali dubbi e – se non hai un negozio nelle vicinanze – puoi ordinare la tua chitarra direttamente da noi.
Ti chiediamo di usare, in entrambi i casi, i moduli di contatto presenti nella panoramica del configuratore. Solo così possiamo assicurarci che tutte le informazioni necessarie vengano comunicate correttamente.
In alternativa, possiamo inoltrare l’ordine al rivenditore Lakewood più adatto per te.
La costruzione di una chitarra Custom Shop richiede circa 3 mesi – a seconda della complessità dello strumento, indipendentemente dalla modalità di ordinazione.
Posso scegliere il legno della mia chitarra Customshop a Lakewood?
Innanzitutto puoi stare tranquillo: grazie alla nostra lunga esperienza, selezioniamo sempre legni di altissima qualità per la tua chitarra. Alcuni legni esotici hanno una trama molto variabile. Se quindi per te sono particolarmente importanti il colore e la venatura, puoi chiamarci per ricevere una consulenza oppure venire direttamente in laboratorio a scegliere il legno per la tua chitarra. In questo caso è necessario fissare un appuntamento.
Sul nostro sito trovi anche una galleria di legni davvero speciali, che abbiamo già selezionato e fotografato per via delle loro eccezionali qualità tecniche ed estetiche. Qui puoi scegliere uno di questi legni esclusivi per la tua chitarra Customshop, con la certezza che nascerà uno strumento fuori dal comune.
È possibile modificare la forma e la costruzione di una chitarra Customshop?
Tuttavia, il nostro configuratore 3D ti offre un modo davvero completo per personalizzare la tua chitarra secondo i tuoi desideri – troverai sicuramente ciò che fa per te!
Se hai richieste particolari oltre a questo, chiamaci oppure scrivici a info@lakewood.de.
È possibile realizzare un intarsio personalizzato?
Realizziamo anche intarsi personalizzati su richiesta – dai segnaposizione alternativi alla tua firma, fino a forme e motivi complessi. Da semplici disegni monocromatici fino a vere opere d’arte multicolori. Realizzati in madreperla, abalone, vari tipi di legno, oro o materiali naturali di ogni tipo.
Nella nostra galleria fotografica puoi vedere alcuni esempi di intarsi personalizzati sulla tastiera.
Ti interessa? Hai già un’idea precisa o solo un’ispirazione per qualcosa di davvero speciale? Allora scrivici a info@lakewood.de oppure chiamaci!
Insieme a te creiamo qualcosa di davvero unico.
E a proposito: possiamo anche aggiungere il tuo intarsio su una chitarra che già possiedi – che sia una Lakewood o una chitarra di un altro marchio.
Quali sono le caratteristiche di un soffitto in abete rosso?
Le “Haseln” sono particolarità visive del legno d’abete, che si presentano come venature trasversali rispetto alla fibra.
Al momento non esiste una spiegazione scientifica precisa sull’origine di questo effetto.
Le tavole in abete con molti “Haseln” sono spesso più dure rispetto a quelle normali, e possono quindi essere lavorate leggermente più sottili – il che può migliorare la risposta della chitarra.
La loro particolarità sta soprattutto nell’aspetto visivo unico.
Ogni nostro top in abete con “Haseln” è selezionato con cura ed è un pezzo unico – la base perfetta per una chitarra davvero speciale.
Legni, costruzione e altri materiali 21
Quali legni vengono utilizzati per le chitarre Lakewood?
Puoi visitare l’assistente legni del Lakewood Customshop per scoprire tutti i legni che utilizziamo, le loro caratteristiche e il loro impiego nella costruzione delle nostre chitarre.
Troverai inoltre legni tonali specialiGalleria dei legni.
>
Is the timber used by Lakewood from sustainable forestry sources?
How long is the storage and curing period of tone woods?
Can cured wood still distort?
What is the difference between AAA and AAAA tops?
AAAA tops are slightly more evenly grained, have an optimum relationship between weight and stability and are slightly stiffer. Consequently, they have better tonal potential.
What is the difference between AA and AAA Rosewood?
Does a cutaway affect tone?
Can the open-pore finish provide adequate protection for my guitar?
What are the advantages of a high-gloss finish?
By the way, satin finish and high-gloss varnishes are of an almost identical thickness.
Does the installation of a Pickup System alter the tone?
Quali meccaniche usa Lakewood?
What material is used for the nut and bridge?
What is the composition and gauge of our fret wire?
How are Lakewood guitars lacquered?
Open-pored matt finish
This finish is standard for all instruments in the ‘Natural’ series.
Back, sides and neck receive two coats of polyurethane primer. The top receives a total of five coats of primer, each of which is rubbed down. After hardening, all surfaces are carefully rubbed down and then finished with two coats of polyurethane matt lacquer. Despite visible pores on the back, sides and neck, the lacquer surface is permanently sealed.
Closed pore satin finish
This is the standard finish for necks in the ‘Deluxe’ and ‘Premium’ series and is offered as an option for guitar bodies in the Custom Shop. All surfaces receive two coats of polyurethane primer. After the interim rub down, a transparent pore filler is applied which is hardened by means of UV light. This is followed by three coats of UV curing acrylic lacquer. Then all surfaces are carefully rubbed down and finished with two coats of polyurethane matt lacquer
High Gloss Finish
This is the standard finish for bodies in the ‘Deluxe’ and ‘Premium’ series and standard for the upper headstock surface of ‘Premium’ instruments. All surfaces receive two coats of polyurethane primer. After an interim rub down, a transparent pore filler is applied which is hardened by means of UV light. This is followed by three coats of UV curing acrylic lacquer. Then, after a further rub down, another three coats of UV curing acrylic lacquer are applied which are finely rubbed down and machine polished to the final high gloss finish.
Sunburst and Black Lacquer
With these finishes, the colour is introduced during the lacquering process into one of the coats. This is then protected by the subsequent coats of transparent lacquer.
Is there a difference in tone between matt and high gloss guitars?
Is there a risk of damage to the finish of a Lakewood guitar from rubber or synthetic materials used in guitar stands or wall brackets?
What is the Lakewood body-to-neck connection?
The neck is connected to the body by way of 2 bolts and the fret board is glued to the soundboard. In this way, a perfect, tight connection is established which may readily be opened, if necessary, for purposes of service.
What glue does Lakewood use?
What strings are Lakewood Guitars equipped with?
6-string guitars
D'Addario XS .012-.053 Phosphor bronze (.012 .016 .024 .032 .042 .053)
12-string guitars
D'Addario XS .010-.047 Phosphor bronze (.010|.010 .014|.014 .023| .008 .030|.012 .039|.018 .047|.027)
Baritone guitars
D'Addario XT .016-.070 Phosphor bronze (.016 .022 .029 .048 .060 .070)
Nylon string guitars (Crossover)
D'Addario XT Classical Hard Tension
Which pickup system does Lakewood use?
Which pickup systems did Lakewood use in the past?
1987-1990
Electronics by AER with volume, bass and treble attenuation by means of three pots located adjacent to the neck joint on the upper bout. Internal holder for a 9v battery. Transducer 091 by Shadow.
1991-1994
Electronics MK-2 by AER with volume, bass, mid and high frequency attenuation. Individual volume adjustment for each string. Operating console located below the waist on the upper side of the guitar. Externally accessible holder for 2 x 9v batteries, located adjacent to the endpin. Transducer Type 066 polyphonic in 80mm and 84mm length by Shadow.
1991-1995
Electronics MK-1 by AER with volume, bass and treble attenuation. Operating console located below the waist on the upper side of the guitar. Externally accessible holder for 1 x 9v battery, located adjacent to the endpin. Transducer Type 066 monophonic in 80mm and 84mm length by Shadow.
1996-1997
Electronics MK-3 by AER with volume, bass, mid and high frequency attenuation. Parametrically adjustable notch filter. Operating console located below the waist on the upper side of the guitar. Externally accessible holder for 1 x 9v battery, located adjacent to the endpin. Transducer Type 066 monophonic in 80mm and 84mm length by Shadow.
1998-2002
B-Band Core with internal battery pouch for 1 x 9v battery. No volume or tone adjustment.
B-Band Core + Microphone with internal battery pouch for 1 x 9v battery. No volume or tone adjustment.
B-Band New Frontier with volume, bass and treble attenuation. Operating console located below the waist on the upper side of the guitar. Internal battery pouch for 1 x 9v battery.
B-Band New Frontier + Microphone. Volume, bass and treble attenuation plus microphone blender. Operating console located below the waist on the upper side of the guitar. Internal battery pouch for 1 x 9v battery.
2003
B-Band A-3 with Volume, bass and treble attenuation. Operating console located below the waist on the upper side of the guitar. Internal battery pouch for 1 x 9v battery.
2003-2005
B-Band A-1 with internal battery pouch for 1 x 9v battery. No volume or tone adjustment.
2003-2005
B-Band A-6 with volume, bass, mid and treble attenuation. Parametric presence adjustment. Notch filter. Blend regulation for two pick-ups. Operating console located below the waist on the upper side of the guitar. Externally accessible battery holder for 1 x 9v battery adjacent to the endpin.
2004-2005
B-Band A-5 with volume, bass, mid and treble attenuation. Parametric presence adjustment. Notch filter. Blend regulation for two pick-ups. Operating console located below the waist on the upper side of the guitar. Externally accessible battery holder for 1 x 9v battery adjacent to the endpin.
2006-02/2012
Lakewood Sonic System, manufactured by Shadow. Volume and tone adjustment. Switchable Notch filter. Blend regulation for piezo-ceramic under-saddle transducer and magnetic fret board pick-up. Operating unit with battery located under sound hole rim.
2006-02/2012
Lakewood Classic System, manufactured by Shadow. Volume and tone adjustment. Switchable. Operating unit with battery located under sound hole rim.
2006-02/2012
Lakewood Mini Sonic System. Volume and tone adjustment. Operating unit with battery located under sound hole rim.
Further information on the Sonic System and the B-Band Systems can be found in the chapter Pickup systems we fitted in the past.
Cura, ispezione e conservazione 21
Come prendersi cura delle superfici verniciate della chitarra?
How do I care for the unvarnished fret board of my guitar?
How do I restring my guitar?
Guitar strings are secured by means of bridge pins which fit into the slots of the bridge at one end and by way of a hole in the shaft of the machine head (tuner) at the other end. The quality of these securing parts is fundamental to the tuning integrity of the guitar.
Securing strings at the bridge end
The strings are inserted into the slots of the bridge by means of suitable pins. Kink the ball-end of the string slightly before inserting it into the slot. Then press the pin firmly home into the slot, taking care to face the channel of the pin in the direction of the sound hole.
Now, by tightening the string, the ball-end will be wedged by the pin against the bridge plate on the underside of the sound-board.
Should the pin at any stage move upward, simply push it gently (but firmly) back home. The pins are not unduly forced so that they may be removed freely when the string tension is released.
Securing strings at the machine heads
Guitar strings are made longer than required and it is not advisable to wind the entire length onto the tuner shaft. With flat headstocks, strings are easily accessible while slotted tops make this somewhat more difficult.
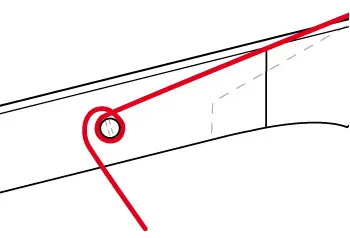
With flat headstocks start with the e-1 string and put 2 loops onto the tuner shaft winding from inside to outside.
Take care to hold the string tightly and wind from the bottom of the shaft towards the top end.Then thread the string through the hole again.
This second threading of the string will prevent slippage during the tuning process. It is only required for the unwound e-1 and b-2 strings.
Now use a string winder to tighten the strings. The final tension is only decided when all strings have been tightened. The tightening sequence is as follows: e-1, b-2, g-3, E-6, A-5 and lastly D-4. Although this sequence has been proven, it is not obligatory.
The wound g-3, E-6, A-5 and D-4 strings may be passed through the hole in the shaft only once and then clipped off.
When all strings have been fitted, you can proceed with tuning. Since all strings will settle at both ends, stretch each one after the initial tuning, by pulling gently. The tuning will flatten and a second pass will be needed. This may be repeated a few times, as required, until the strings hold their pitch. (Tip: whenever tuning your guitar, gently stretch the strings first; they may have slipped overnight for climatic or temperature reasons and you may find that they are in tune or nearby after the stretch!).
Lastly, you may clip excess string ends as close to the tuner shaft as possible, to avoid injury.
Strings may remain a little unstable in the first few days after fitting but will then settle and hold their pitch.
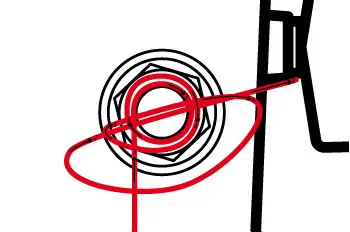
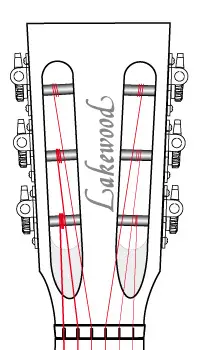
With slotted headstocks insert the string through the headstock slot, pass it around the shaft and back through the slot again from behind. Now stick the string end through the slot again (see diagram below)
before finally threading it through the hole.
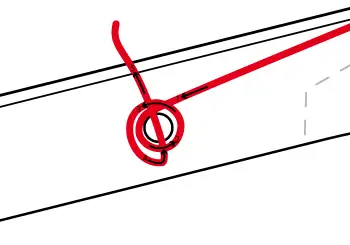
You may want to thread the unwound strings through the shaft hole a second time to secure them more firmly, as described above for flat headstocks.
Now the strings can be tightened by means of a winder to a point where they are firm in the nut and on the tuner shaft, albeit not yet at concert pitch. As with flat headstocks, strings are tensioned in the following sequence:- e-1, b-2, g-3, E-6, A-5 and lastly D-4. All strings should wind onto the shaft toward the outside of the headstock (see diagram).
 Now tune and stretch the strings as described above for flat headstocks. Finally, excess string ends can be clipped, taking care not to damage the wood with steel tools.
Where should I store my guitar?
What should I do when undertaking air travel with my guitar?
Ci sono istruzioni particolari se porto la chitarra con me in altre zone climatiche?
Le chitarre Lakewood sono costruite in condizioni climatiche controllate, il che le rende relativamente resistenti alle variazioni di umidità.
Tuttavia, un clima estremamente secco o umido può comunque mettere sotto stress i materiali naturali e la struttura dello strumento.
In queste fasi, la tua chitarra sta meglio al sicuro nella sua custodia.
In combinazione con un Humidipak di D’Addario, si crea all’interno della custodia un clima ideale per la tua chitarra.
Is damage caused by extreme humidity or temperature covered by the Warranty?
Ha senso utilizzare umidificatori o deumidificatori?
Come primo passo, basta acquistare un igrometro di buona qualità. Ti aiuterà a capire se è davvero necessario umidificare o deumidificare l’ambiente.
Durante il periodo di riscaldamento in inverno, l’aria della stanza può diventare molto secca. In questo caso ti consigliamo di usare un umidificatore oppure di conservare la tua chitarra nella custodia con un Humidipak di D’Addario.
Raccomandiamo gli umidificatori della marca Venta, ad esempio il Venta Airwasher LW25.
È importante scegliere un umidificatore adatto alla dimensione della stanza! E fondamentale: controlla sempre il livello di umidità con un igrometro per evitare che l’ambiente diventi troppo umido.
In ambienti particolarmente umidi può essere utile anche l’uso di un condizionatore e/o di un deumidificatore.
Is it worthwhile buying a Hygrometer?
Tieni presente che la maggior parte degli igrometri – sia analogici che digitali – ha tolleranze elevate e può mostrare valori imprecisi.
Per questo vale davvero la pena investire in un buon igrometro.
Should the string tension be reduced if the guitar will be out of use for some time?
How can I measure and adjust the action of my guitar?
General
The gap between the strings and the frets is referred to as ‘the action’. Note that this is not the distance between the strings and fret board. Also, in determining the action, the gauge of the strings is not relevant. Essentially, it is the clear gap between the strings and the frets which is generally measured at the 12th fret for the e-1 and E-6 strings.
The action plays a role as to the playability of the guitar, but also influences playing dynamics. For this reason, generally applicable parameters are not mandatory – one size does not fit all; action is a personal choice.
At Lakewood we endeavour to set up our guitars so as to suit the preferences of the majority of Players.
Measuring the action
Important: before altering the action, check the neck with regard to the truss rod which may require adjustment.
See more on this at How to adjust the truss rod?
For measurement of the action, you will need a short ruler - but a 20 and 50 Eurocent coin will do the trick too!
As mentioned, the action is measured as the clear gap between string and fret at the 12th fret. For average playing dynamics and light gauge strings (.012-.053 inch) the generally accepted values are 2,0mm for the e-1 string und 2,5mm for the E-6 string. These gaps can either be determined by way of a ruler
or very simply by means of suitable coins.
For the e-1 and an action of 2,0mm the 20 Eurocent coin is perfect and for the E-6 string with an action of 2,5mm, the 50 Eurocent coin does the job. If you can just slide the relevant coin into the gap, you will have achieved a 2,0 – 2,5mm action.
Adjusting the Action
Should you want a lower or higher action, this will be subject to certain limits.
The strings require room for unimpeded oscillation and this will restrict your desire for a very low action. This may be depicted graphically as follows:
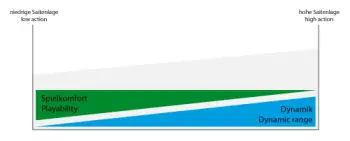
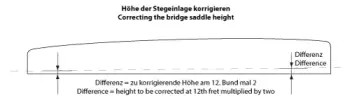
So, to adjust the action, the saddle height will need to be altered. This is achieved by adding to or subtracting from the bottom of the saddle insert. This difference is calculated at twice the value to be added to or subtracted from the gap at the 12th fret.
Adding to the saddle height can be achieved by means of a suitable shim to be placed on the pickup element.
Lowering the saddle is done by carefully removing material from the bottom of the saddle insert. In doing so, great care must be taken to retain the absolute evenness of the bottom surface. Failure to do so will impact on the acoustic qualities of the guitar and/or its performance via the pickup. Take the advice of a technician if you are unsure about this procedure.
Should a materially higher action be required, this may impact the bridge, depending on type and geometry. The saddle insert should not protrude by more than 6mm over the surface of the bridge. A higher saddle insert would result in too acute an angle for the strings.
Come regolare il truss rod (barra di regolazione)?
Le chitarre Lakewood sono dotate di un truss rod regolabile situato sotto la tastiera. Il dado esagonale di regolazione da 5 mm è accessibile tramite un’apertura nella traversa tra la buca e la tastiera. La regolazione del truss rod influisce sulla curvatura (relief) della tastiera. Quando è impostato correttamente, la tastiera presenta una leggera curvatura concava. Il truss rod serve a stabilizzare il manico e la tastiera, ma non deve essere utilizzato per regolare l’action delle corde.
Per regolare il truss rod, ti serviranno:
Un capotasto mobile (capo)
Una chiave a brugola (Allen) da 5 mm con braccio lungo
Uno spessimetro (feeler gauge) da 0,5 mm
Procedi così:
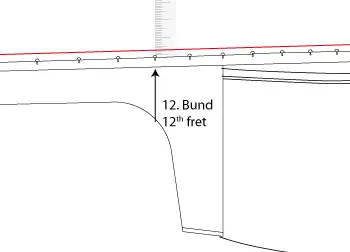
Posiziona il capo al primo tasto.
Premi la corda di Mi basso al 14° tasto.
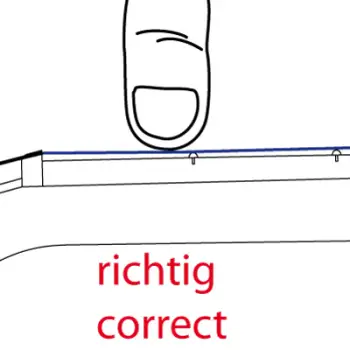
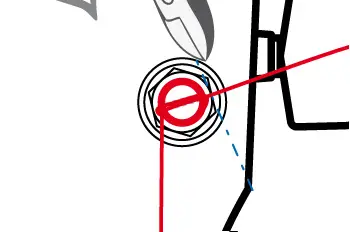
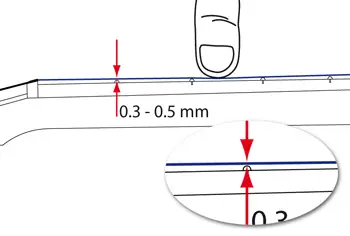
Inserisci lo spessimetro al 7° tasto tra la corda di Mi basso e il tasto (vedi immagine 2).
A. Se lo spessimetro entra perfettamente, il truss rod è regolato correttamente.
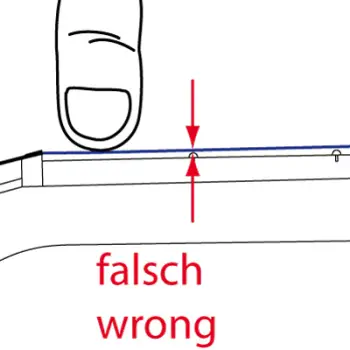
B. Se lo spazio è troppo stretto, il truss rod deve essere allentato. Inizia con un quarto di giro in senso antiorario e verifica di nuovo con lo spessimetro. Ripeti se necessario.
C. Se lo spazio è troppo ampio, il truss rod deve essere serrato. Inizia con un quarto di giro in senso orario e controlla di nuovo. Ripeti se necessario.
Se non ti senti sicuro nel regolare il truss rod, contattaci pure via e-mail o telefono!
Come si regola il sistema L.R. Baggs Anthem
Il sistema L.R. Baggs Anthem è dotato di due sorgenti di segnale. Il pickup “Element” è un trasduttore presente sotto al ponte, il “Tru · Mic” invece è un microfono a condensatore installato all’interno del piano armonico in corrispondenza del ponte. Entrambi i segnali catturano e riproducono il suono della vostra chitarra nella maniera più naturale possibile, niente di più.
1. Controllo del mix (miscela il segnale tra microfono e pickup al ponte)
Quando il controllo del mix è completamente ruotato in direzione del manico, il microfono interno (Tru · Mic) cattura la maggior componente di suono della chitarra, delegando al pickup “Element” la sola cattura delle frequenze più basse del suono. Quando invece il controllo è ruotato completamente in direzione del ponte, si otterrà esclusivamente il suono proveniente dal pickup “Element”. Lasciamo a voi la sperimentazione delle posizioni differenti per adattare il suono più giusto a ogni esigenza.
2. Inversione di fase
Per invertire la fase del segnale di uscita in relazione alla corda vibrante è indispensabile premere il pulsante phase presente nel controllo. Molte volte cambiare la fase permette di ottenere un suono migliore e/o eliminare eventuali problemi di feedback dello strumento.
Raccomandiamo di provare entrambe le impostazioni prima di ogni performance.
3. Controllo del volume
Ruotando il controllo in direzione del manico aumenta il volume, viceversa ruotando in direzione del ponte.
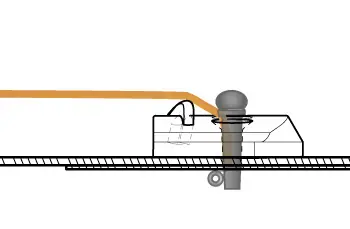
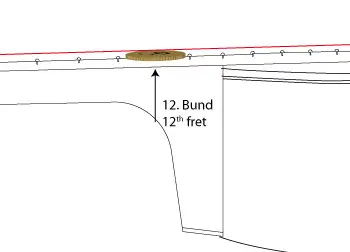
4. Controllo della batteria e custodia batteria
Il sistema Anthem è alimentato da una batteria esterna da 9V. Premere il bottone (4) per controllare lo stato di carica rimanente. Una batteria nuova accende tutti e cinque il LED presenti sul controllo alla buca (4.1) garantendo una durata di circa 170 ore di servizio. Quando nel sistema si illuminano solo due LED si ha a disposizione circa 8 ore di servizio. Nel caso si illumini solo un LED consigliamo di sostituire la batteria al più presto.
La batteria risiede in una soffice custodia installata internamente alla chitarra vicino al blocco del manico (vedi fig.2).
Per il cambio della batteria ricordiamo di allentare la tensione delle corde. Così facendo si avrà accesso con una mano all’interno della chitarra e si potrà estrarre facilmente la batteria dalla sua custodia per sostituirla con una nuova. Staccare con cura il connettore dalla batteria esausta e attaccarlo a quella nuova. Riposizionare la nuova batteria all’interno della custodia assicurando la chiusura col velcro. Durante il cambio della batteria fare particolare attenzione nel non compromettere nessun cavo interno.
Per ottimizzare la durata della batteria, assicurarsi di staccare il connettore jack dallo strumento ogni qualvolta non sia amplificato. Il controllo dello stato della batteria funziona anche in assenza del cavo collegato.
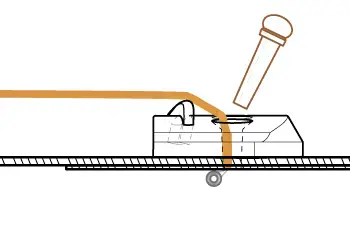
5. Regolazione del volume microfono
Per regolare il volume del microfono bisogna servirsi di un piccolo cacciavite. Il corretto settaggio di questo controllo è fondamentale per il corretto funzionamento del sistema Anthem.
Inizialmente si posizioni il controllo mix (1) in posizione aperta ruotandolo verso il manico. Si testi lo strumento amplificato con l’ausilio di un P.A. o di un amplificatore per chitarra acustica, intervenendo sul controllo trim pot col cacciavite (5). Il suono finale dovrà risultare ben bilanciato all’orecchio ed il più possibile simile al suono acustico del nostro strumento non amplificato. Se avvertiamo una mancanza di chiarezza sulle frequenze alte, interveniamo sul volume del microfono ruotando il trim pot in direzione oraria. Viceversa invece se si avverte una chiarezza o un rumore eccessivo.
Ricordare: Noi preconfiguriamo il livello del sistema L.R. Baggs Anthem in fase di assemblaggio per un settaggio immediatamente funzionante. Suggeriamo di provare il nostro settaggio prima di intervenire direttamente sui controlli.
What is the Operating Duration of the L.R. Baggs Anthem Pickup System?
How do I install the second strap button?
You'll find a manual for this in the download area.
How the nut can be checked
General
The nut is located at the top end of the fret board at the point where the fret board joins the head stock. The purpose of the nut is to position the strings in the correct spacing from each other from the fret board edge and at the correct height above 1st fret. The precision of the nut is a prerequisite for perfect playability and comfortable action, especially with unfretted or ‘open’ strings. The notches guide the strings without choking them during tuning.
Checking the notches
Strings must be at the correct clearance above the 1st fret. To determine this, fret each string with your ring finger at the 3rd fret and simultaneously lightly tap the string with your index finger at the 1st fret, checking the gap between string and 1st fret (see diagram). The gap should be the thickness of a business card. After a while your eye will focus more readily on the affected area and you will be able to assess the gap more easily.
Correcting the nut
For technical reasons, a correction of the nut will not be possible for you. However, should your guitar’s nut require adjustment, please contact service@lakewood.de for assistance. Unlike a bridge insert, nuts cannot be delivered for fitment by the player since each one is uniquely finished for its guitar. For this reason, the correction or exchange of a nut requires a luthier‘s expertise.
Problems and questions
- A deviation is detected when checking the nut.
Answer: please contact service@lakewood.de - The nut has come loose during restringing.
Answer: The nut is simply held in place by means of a small amount of wood glue. You can refix it into the correct position by means of a drop of glue, taking care to place it centrally and hard against the fret board. - What is the material from which a guitar nut is made?
Answer: Argentinian bleached cattle bone. - What can be done about strings which catch in the nut during tuning?
Answer: depending on string gauge and composition, strings can catch in the nut grooves. This can be reduced by rubbing the offnding groove with graphite (pencil lead). - Some strings rattle when played open. What has happened?
Answer: Over time, the grooves have been deepened due to repeated tuning. The nut must be repaired or replaced. As the nut is wearing part, this is not covered by the warranty.
Come controllare il ponticello (saddle)
Generale
Il ponticello è inserito in una scanalatura inclinata all’indietro sul ponte, che serve anche da ancoraggio per le corde. Il ponticello trasmette l’energia delle corde al ponte, che a sua volta mette in vibrazione la tavola armonica. In questo modo si avvia il processo di oscillazione – un processo in cui la corretta posizione del ponticello è fondamentale per garantire una buona qualità del suono.
L’altezza del ponticello può essere regolata per adattare l’action delle corde.
Il ponticello deve inserirsi perfettamente nella sua sede, senza muoversi né incastrarsi.
Le corde passano sopra il ponticello a distanza regolare, e con il tempo è normale che si formino piccoli solchi nei punti di contatto.
Questi possono essere eliminati con carta vetrata molto fine (grana 320–400). A questo scopo, allenta le corde sul ponte e rimuovi il ponticello, tenendolo tra pollice e indice. Con una mano tieni il ponticello e con l’altra carteggia delicatamente la superficie curva finché i solchi scompaiono. Per una finitura liscia, puoi lucidare la zona interessata con un po’ di dentifricio (la marca la scegli tu!).
Infine, rimetti il ponticello nella sua sede, facendo attenzione che l’estremità più alta sia rivolta verso il lato delle corde basse.
Domande
Di che materiale sono fatti i ponticelli?
Risposta: I ponticelli Lakewood sono in osso.
Posso usare altri materiali come Tusq, Corian o ottone?
Risposta: Sì, purché il nuovo ponticello si adatti perfettamente alla sede nel ponte.
Posso ordinare un nuovo ponticello per la mia chitarra?
Risposta: Sì, puoi richiederne uno scrivendo a service@lakewood.de
Care and maintenance of the Machine Heads (tuners)
The tuners are fixed to the head stock. Closed-housing tuners are secured by way of a 10mm hexagonal nut which holds the bearing of the tuner post against the head stock top, while the housing is held to the back of the head stock by way of a small screw. These fastenings can loosen over time. To retighten the hex nut, use a 10mm open spanner in a clockwise direction. The strings do not need to be loosened. For the small wood screw holding the housing, a fine Philips screwdriver is needed. Neither of these fastenings must be over tightened. Simply ensure that the tuner housing is secure and does not move.
Tuners without a housing (open) are secured by a bearing tube. By applying lateral pressure, check whether this tube is loose. If so, remove it with your fingernail. Then apply a small drop of domestic glue and re-insert it into position.
On guitars with a slotted head stock, the tuners are positioned by way of holes in the flanks and middle of the slots which obviate the need for metal bearings.
The base plate for open tuners are fixed to both flat and open head stocks by way of 2 small Philips wood screws. Check these periodically and tighten gently, if necessary. The wood screws should always be in contact with the tuner base plate.
The knobs of open tuners are held in place by means of glue. The bond can be checked by tuning the string; if loose, it will be difficult or even impossible to tune the string. The knob will turn on the pin and may even be pulled off. Applying a minimal amount of ‘superglue’ into the hole, the knob can be replaced onto the pin. Wait a while before using that tuner again.
The knobs of tuners with housings are attached by screws which can be tightened by means of a Philips screwdriver. The tightness of these screws determines the ease of operation of the tuner. If over tightened, the tuner will be hard to turn; if it is too loose this may lead to vibration noise and cause poor tuning stability.
Wooden tuner knobs have a metal sleeve which could loosen. This may lead to difficulty in tuning the affected string and may also cause vibration noise. In this case, it will be necessary to remove the knob from its sleeve. Tune the string down at least one full tone and loosen the screw at the outside of the tuner knob with a suitable screwdriver. Take care, when removing the knob, that the two washers of metal and plastic respectively, remain on the tuner pin. These washers are essential for the proper functioning of the tuner. After removing the tuner knob, separate the metal sleeve, apply a drop of ‘superglue’ and then reassemble the knob and sleeve.
Chromed and gilded tuners are made in one piece and have no sleeve.
How do I apply a Pickguard?
Misurazione e ottimizzazione dell’intonazione all’ottava
Generale
L’intonazione all’ottava è definita dalla precisione delle corde al 12° tasto della chitarra. La correttezza di questa intonazione determina la suonabilità dello strumento: se non è precisa, la chitarra non può essere accordata correttamente. Tuttavia, la tecnica di esecuzione e le tolleranze delle corde consentono solo un risultato teoricamente perfetto. Nella pratica, non si può aspettare una precisione assoluta dell’ottava.
È importante saperlo — ma niente di grave!
Misurazione e valutazione
La misurazione si effettua confrontando l’armonico naturale con la nota premuta al 12° tasto.
Per produrre un armonico, appoggia leggermente il dito sulla corda, pizzica la corda e solleva il dito subito dopo. Gli armonici si formano solo in punti specifici della corda, in questo caso esattamente a metà, cioè al 12° tasto.
Fai attenzione a non premere troppo o di lato sulla nota premuta.
Le due frequenze dovrebbero, idealmente, essere identiche. Un orecchio allenato può percepire anche piccole differenze, ma per una valutazione più precisa ti conviene usare un accordatore, che ti permetterà di misurare la precisione dell’ottava e le deviazioni di ciascuna corda. Deviazioni di ±5 cent sono accettabili.
Annota la differenza tra l’armonico e la nota premuta per ogni corda e ripeti la misurazione più volte per ottenere una media indipendente dalla tecnica di esecuzione.
Esempio di valori:
e-1: –5 cent
b-2: +1 cent
g-3: ±0 cent
D-4: –5 cent
A-5: –5 cent
E-6: –1 cent
Questo indica che è necessaria una correzione per le corde b-2 ed E-6. Come si fa?
Ottimizzazione
Torniamo al ponte: segue la curvatura della tastiera ed è circa 1 mm più basso sul lato acuto rispetto a quello basso. Il ponticello in osso inserito nel ponte è largo circa 2,5 mm, e le corde scorrono sopra la sua parte centrale.
Per correggere l’intonazione di una corda, il punto di contatto sul ponticello deve essere spostato. Se l’accordatore mostra una deviazione positiva (+ cent), il punto di contatto deve essere spostato verso il retro, cioè lontano dalla buca. In caso di deviazione negativa (– cent), deve essere spostato verso la buca.
Ti chiedi forse se regolazioni così minime possano davvero funzionare: sì! Per una deviazione di +10 cent, il punto di contatto deve essere spostato di circa 0,75 mm lontano dalla buca.
Gli strumenti necessari per questa regolazione potrebbero non essere disponibili. Contatta service@lakewood.de
How do I apply the new transparent Lakewood Pickguard?
Tutorial Video
Easiest of all will be for you to take a moment to view our tutorial-video in which we provide a step-by-step procedure for you to apply the pickguard onto the guitar soundboard without any complication.
Application of the pickguard in 4 easy steps
Step 1
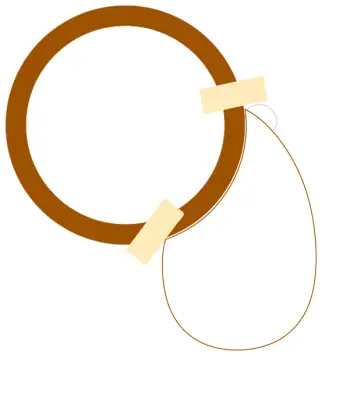
First clean the soundboard surface with a cloth (e.g. the Lakewood microfiber cleaning cloth). If necessary, use a cleaning agent which will not leave any greasy, oily or silicone residue on the surface which must ideally be dry and dust-free.Place the pickguard onto the soundboard without removing the protective film. In this way it will not yet adhere and can be positioned freely. Find the desired position by sliding back and forth. Optically important is to ensure that the concave section of the pickguard fits precisely along the soundhole rosette line. For Lakewood guitars this radius fits perfectly. Should you have another model, this must be achieved by approximation.
When you have determined the correct position, mark two reference points (preferably the two "corners" of the pickguard as pictured) by way of sellotape. This will enable you to return to the same position later.
Step 2
Take the pickguard and, using the tab, remove the protective film from approximately half of the pickguard.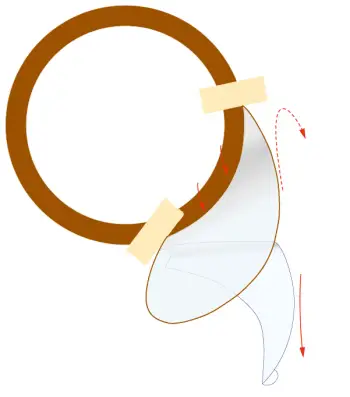
Step 3
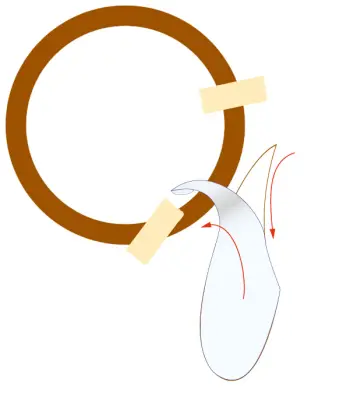
Now place the corners of the pickguard against the taped reference points onto the soundboard surface, starting with the "sharper end". Keep the other end of the pickguard clear, without kinking it. When it is in position, press the pickguard onto the soundboard surface while simultaneously removing the rest of the protective film. Guard against air pockets and small dust particles.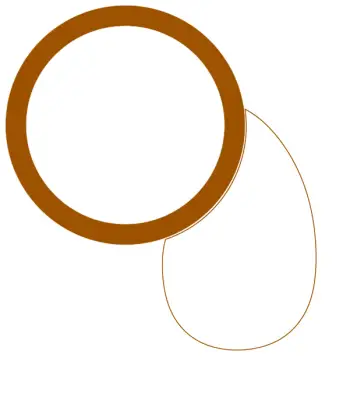
Step 4
Now you have completed the application of the pickguard.Should air pockets have persisted, work these carefully away to the edge with your finger, taking care not to dent the delicate soundboard surface.
Lastly, remove the marker tapes from the soundboard and once again clean the surfaces, checking whether all has been correctly done. If not, don’t despair – you can simply repeat steps 1-4.
Note
Note: despite due care on our part, the pickguard cannot be guaranteed for complete UV-transparency. Over time slight wood coloration differences may arise on the affected area which means that there may be a lighter colour tone where the pickguard was placed.
Technical Data
We would like to furnish you with the following data for the pickguard as provided by the supplier. These are given without any warranty.
Lakewood Guitars GmbH " Co. KG does not take any liability for possible lacquer intolerances.

Optical property
| Property | Test Method | Result |
|---|---|---|
| Transmittance (400-700nm) | Transmittance tester | Ave. 94 |
| Transmittance (400-700nm) | Spectrophotometer | Ave. 94 |
Physical property
| Property | Test Method | Result |
|---|---|---|
| Pencil hardness | 500g (ASTM D3363 / JIS K5600) | 8H |
| Surface abrasion | Steel wool (#0000) at 750g/cm3 (ASTM D1044) | No scratch |
| Adhesion | 10x10 sections (ASTM D3359 / JIS D0202) | 100/100 |
Note: Values assigned represent the results of tests conducted and are not standard values guranteed.
Chemical resistance
| Property | Test Method | Result |
|---|---|---|
| Ethanol | The chemical was deposited on the surface of the coating and allowed to stand for 30 minutes at room temperature. Then the chemical was wiped off and the coating sample evaluated. | No remarkable change. |
| IPA | No remarkable change. |
Note: The change of the optical and physical charachteristic between before and after test was measured.
Status: August 2016

Visita al laboratorio
Una volta al mese – sempre il penultimo venerdì – apriamo le nostre porte ai visitatori. Tra le 10 e le 16 puoi venire a trovarci. La visita guidata inizia alle 10:30 e dura circa 2 ore.Vivi da vicino come nascono le nostre chitarre, conosci i legni sonori e poni direttamente le tue domande sul posto. Puoi provare le chitarre, acquistare chitarre e accessori oppure semplicemente ricevere una consulenza sul Customshop.
La partecipazione è gratuita, i posti sono limitati a 18 persone.
Prossima data con posti disponibili: 24 lug 2026 Registrati ora